

I’m posting this for a reader that wanted to organize her craft room…well…if you have 2 shutters…this will help
A friend gave me 2 shutters when he moved. I knew I could do something with them. So I decided to make a catch all for all my stuff. the area in the middle is made of cork board squares where I can post my ideas. The shutters are just the right width to hold hanging file folders.
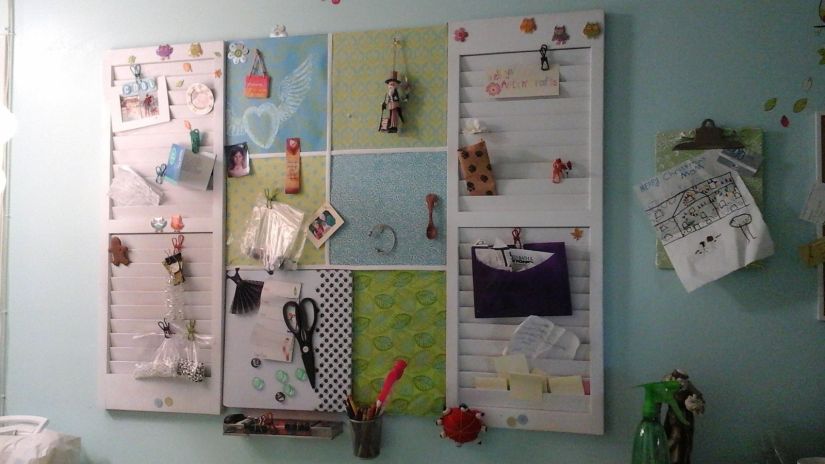
This pic is when I made it about 1 year ago….it’s much filled now.
Materials You’ll need for the project:
2 Wooden Shutters
Can of White Spray Paint
5-6 Cork board Squares (thin kind)
1 Magnetic/Dry Erase Board (optional)
1/4 Yard of fabric for each square. Or 1 yrd same material
Spray Adhesive
Fabric Glue for the ribbon
White Ribbon
Hot Glue
level
4 Anchor Screws
I actually purchased 6 cork squares to use between the shutters. I didn’t use one of them because I wanted the Magnetic/Dry Erase board. So you can either make a 6th square or use the Magnetic/ Dry Erase board. I purchased all these items at Walmart.
I first painted the shutters white. 2 light coats. Hanging on the wall you don’t see the back of them so I didn’t paint the backs.
While they were drying, I started getting everything together for the cork boards. I laid each cork square on a different material and cut 1/4 more on each side. This doesn’t have to be exact. You just want enough material to wrap behind the square. After making my material squares, I started my first square. I sprayed the cork on one side with adhesive. I then flipped over and hot glued the excess material to the back. (corners like wrapping a gift). If you are going to use a Magnetic/Dry Erase board, it may not be the same size as the cork square, the one I purchased was a bit bigger. So that difference came off the cork square next to it. As you can see in pic.
I pinned the finished squares on the wall. Using a level, I arranged the squares how I wanted them. You can use small nails, tacks, or even glue to attach to the wall.
Now its pretty easy after that. You just line the shutters on each side, and mark where you want the screws to go on the wall. I put 2 anchor screws in each shutter. One on top, one on the bottom.
Where the squares meet, I glued white ribbon. Just to make it look finished. If your using the same material, you don’t have to use the ribbon.
The shutter, I don’t know if you know, but they are the perfect length for folders as you can see on the left shutter. You can also hang magazines in the slots. Wow!

What a great idea! Shutters can be found in many antique stores. Glad you found me in my little corner of the world and thanks for following. Welcome to the fence jumpers. @sheilamgood at Cow Pasture Chronicles
LikeLiked by 1 person
Thank you Sheila…love your little corner of the world!! Shutters are such a awesome find…so much you can do with them!!! Thank you for following my little corner of the world!!!
LikeLiked by 1 person
My pleasure.
LikeLiked by 1 person
I think this is a pretty idea. I have a couple of questions, though. If I’m reading it correctly, you pinned the cork board squares directly to the wall? Is there a reason to do this versus attaching them all to a board and then connecting that one piece to the wall?
With my luck, no matter how I did it, it would fall off the wall. 🙂
Thanks for such a clever idea. Have a beautiful day. 🙂
LikeLiked by 1 person
You could glue them to a thin board. The reason I didn’t was because I didn’t want to add that much weight to the wall. Just in case I wanted to change them out in time. I used very small little nails…like tacks almost. The squares themselves don’t carry much weight at all…just clippings and odds and ends. I hang the heavier items on the shutters. I have had them up now for over 1 year…and haven’t had the need to change out, they are in great condition.(the cork squares.) No…it won’t fall off the wall…have more faith in yourself 😉 It is sooo easy to do, really! Let me know if you have any other questions.
LikeLiked by 1 person
Great idea – keeps everything organized and looks pretty too!
LikeLiked by 1 person
Sad, I had to take everything down.
LikeLiked by 1 person
😿
LikeLike
why are you crying?
LikeLiked by 1 person
Because you are sad, darling! We cats are concerned about our friends!
LikeLike
Great idea!
LikeLike
I love shutters! You can create so much with them. Thank you so much for looking!
LikeLiked by 1 person
great
LikeLiked by 1 person
I thank you so much jocelyn… such a pretty name❤❤
LikeLiked by 1 person