

Have you been looking for DIY projects to decorate your home on a budget? Well, do I have some easy projects for you to try!!

These are those wonderful clipboards upcycled. You can paint 3/4 of the board with chalkboard paint, leaving a space on the bottom to add paint or washi tape. Or you can simply wrap with contact paper.

You can dress up your table with tie-dyed Burlap.Buy enough light-colored burlap yardage from the fabrics store so it hangs 1-2 feet off the ends of your table. Cut it lengthwise so it’s several inches narrower than the width of your table. We used RIT fabric dye in fuschia to dye one-third of the runner at each end. To create a slight ombre effect, we repeated the dye bath on one-sixth of the runner on each end to darken the color. Finish the runner by fringing the edges, if desired.

You can update a $1 store vase with acrylic paint. Hold the vase in your hands and tip it in different directions so the paint rolls around inside, creating a wave of color. Leave some of the vase clear. You can make these tissue paper flowers, twist then wrap the end of the flower with some wire. Cover the wire heavily at the top, then thinly the rest with green floral tape.


Prevent water rings and add a style all at the same time with DIY cork coasters. Cut 4×4-inch squares from thin cork. You can find the cork at your local craft store. Cut a simple herringbone pattern from stencil acetate. Press the stencil onto a cork square and apply acrylic paint.

Create a whimsical mobile with lace and embroidery hoops. Stretch lace fabric in wood embroidery hoops. Trim excess lace. For a clean-lined look, drill two holes on either side of the embroidery hoop fastener and screw the two pieces of the hoop together, then pry off the original hardware. Hang from white cording and position at alternating levels.

All you need to create this funky string art is string, nails, and a board. Map out your design and hammer the nails into the board (don’t pound the nails in completely). Wrap string around the nailheads for the design. If you’re spelling a word, print out the letters and cut them out. Arrange the letters on the board and hammer a nail into each corner of the letters. Wrap string around the outlines of the letters first, then fill in the letters with woven designs.
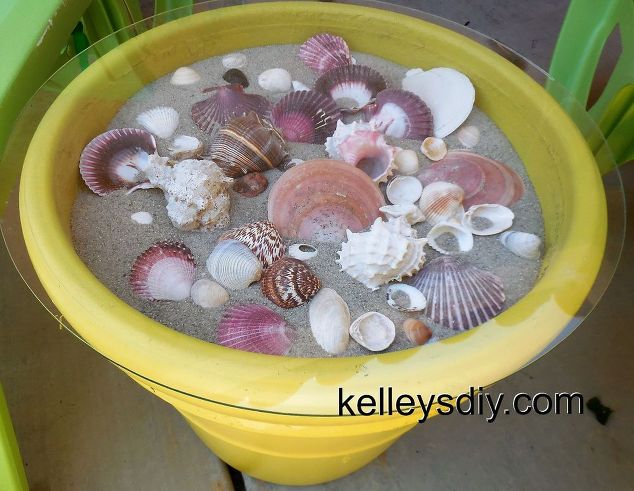
https://kelleysdiy.com/2017/07/18/sea-shell-outdoor-table/
Outside I was playing with Garden Decor when I came up with these:


I love the light I made to hang in the Pergola https://kelleysdiy.com/2017/07/05/chandelier/. These Gazing Ball Stakes https://kelleysdiy.com/2017/04/08/gazing-ball-stakes-3/
Some of the best Crafts I have done, I think, are the ones I made with paint sticks. I did this wonderful post about some of the wonderful projects you can make, using paint sticks. You can find it here: https://kelleysdiy.com/2016/10/18/paint-stick-crafts/
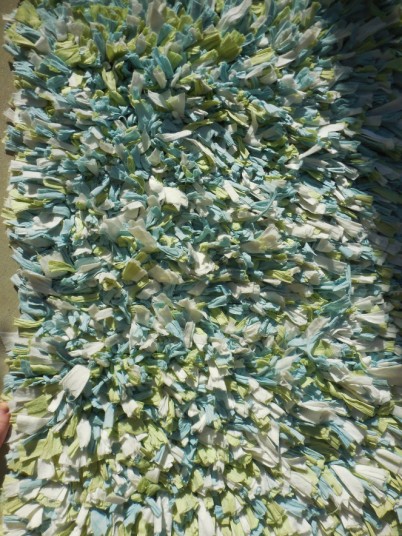
I started by making this Rug Rag. You can see tutorial here: https://kelleysdiy.com/2017/02/01/rag-rug/ug/

Make labels from hardware store wood shims and institute order. They are so inexpensive! Cut a few shims to the desired size by either scoring with a crafts knife and snapping, or trimming with a rotary cutter. Sand each corner to round, and drill a hole in the middle of the thick end, about 1/2 inch from the edge. Use a small foam brush to paint the front and back of each tag with chalkboard paint. Let dry and write or stencil on labels with white charcoal pencil or chalk. Tie onto a bin or basket with a length of baker’s twine.

This is such a pretty idea for spring! Put your best foot forward with a unique flower vase. Arrange your flowers in a regular vase (make sure it will fit inside the boot first). Then simply tuck the vase inside the boot — the more colorful, the better!

Rescue glass jars bound for the recycling bin for this upcycled project. Clean out the jars, poke a hole in the top of the lid, and screw a cabinet knob through the hole. We paired gold knobs with gold lids, but you can also paint the lids to match your hardware. Don’t you just love the metallic gold!

This one is easy. Create shelves with panache using birch logs as supports. Trim sturdy branches to equal lengths, keeping the cuts straight. Paint two 24-inch-long 1×6 boards in the desired color. Attach one board to the bottom of the branches using wood screws, and attach the second board to the top of the branches, again, with wood screws. Hang the shelves using picture-hanging hooks driven into wall studs.

Give a plain roller shade color and punch with a painted pattern. Using a ruler and T-square. Mask off straight stripes with blue painter’s tape. Apply latex paints in your desired colors using a foam roller. Let paint set, peel off the tape, and let the paint dry completely.

Give a mod twist to a wrought-iron chandelier with a string of wooden balls. Select several different-size balls from the woodworking aisle at the crafts store. Screw small metal eye hooks into opposite ends of each ball. Link the eye hooks to chain the balls together, then drape from the chandelier. DIY Tip: Use a pair of needle-nose pliers to grasp and twist the tiny eye hooks.

Put your touch on off-the-shelf furniture by transferring any favorite image — a photograph, a bit of a painting, or even a fabric pattern — to the plain surface. Scan the image into the computer and print it on transfer paper, which you can buy online and from office supply and crafts stores (about $20 for a package of ten 8×10-inch sheets). Follow the package instructions to transfer the image. These bentwood chairs have the perfect smooth surface for such a project.
If you are a budding artist, hand paint your own design!

For virtually no cost at all, you can mold an attractive centerpiece. Employ the simple technique of paper-mache, which involves dipping strips of paper into a solution of equal parts white glue and water. Turn over a mixing bowl and cover it with plastic wrap. Tear strips of paper: book pages, magazines, sheet music, wrapping paper, or wallpaper will work. Here, the artistic look comes from copies of blueprints placed facedown with a layer of patterned scrapbook paper laid right side up. Apply at least three layers of paper to develop a sturdy vessel; let dry. Remove plastic wrap and bowl, and, if necessary, smooth any rough edges with fine-grit sandpaper.
Now, I am pretty sure all of you have seen this inexpensive idea.

Dress your windows quickly and smartly with tea towels turned into cafe curtains. Simply clip drapery rings to the top edges of the towels, and thread the rings onto a curtain rod. You’ll want the curtains to hang down to the windowsill, so mount the rod accordingly. If you have a double-hung window, position the rod so the top edge of the curtain lines up with the sash.
DIY Tip: If necessary, trim the towels to length and hem using a sewing machine — or iron on fusible webbing for a no-sew option.

Create a chic, mid century pendant fixture using just string and a balloon. Purchase a 35-inch balloon from a party goods store, or if you can find it at the Dollar Tree, and blow it up to about 30 inches. Brush it with a thick coat of fabric stiffener, which you can find at fabrics and crafts stores. Wrap the balloon with white crochet string, brushing on more stiffener as you work to ensure a thick coating. Let dry for 24 hours, then pop the balloon.
DIY Steps: Illuminate the shade using an inexpensive light kit for hanging lanterns. First, tie a knot in the cord about 7 inches from the bulb. Thread the plug end through a slit in the center of a plastic butter-tub lid. Using kitchen shears, cut a hole in the top of the globe slightly smaller in diameter than the butter-tub lid. Insert the bulb and lid in the globe. Hang the cord from a hook in the ceiling. Use a low-watt light bulb.
Tin Art
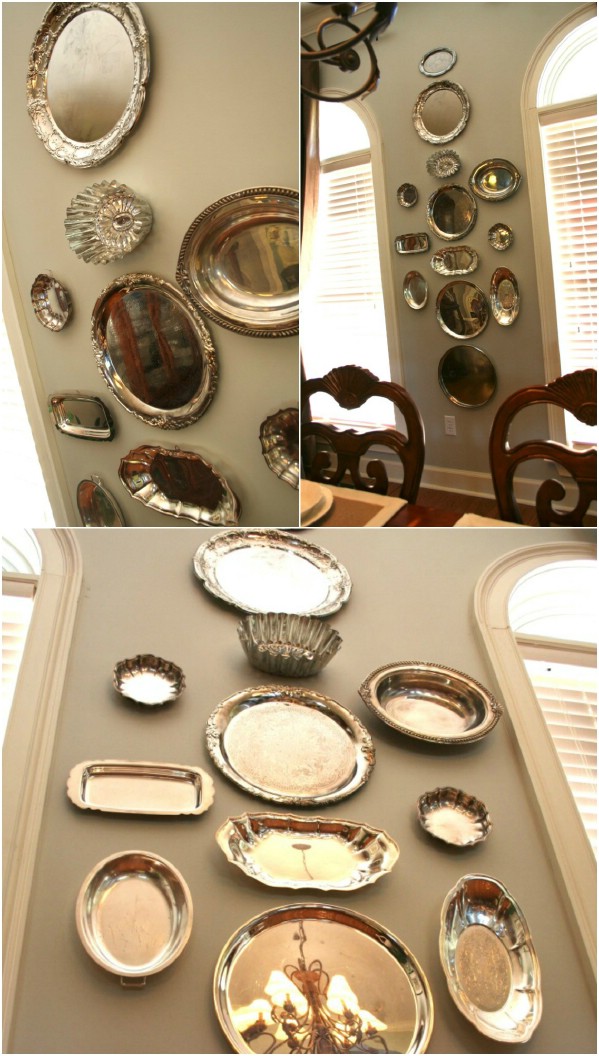
For this project you can get together all your old serving plates, etc and create a beautiful reflective wall. Dollar Tree, you can pick up beautiful serving plates and dishes in a bright silver that look expensive, but only $1.
So, did I get your creative juices flowing? Most of these are so inexpensive to make, and a lot of the items can be found at your Dollar Tree Store.
Have fun creating! If I inspired you to make your own home decoration, please send me a pic to kelleysdiy@gmail.com
Thank you so much for looking!

Waoo..all the Crafts were awesome 🤗
LikeLiked by 2 people
Thank you so much, have a great weekend!☺️❤️️
LikeLiked by 2 people
Very useful post ⭐
LikeLiked by 3 people
Thank you Shahnila! Which did you like the best? Are you going to make? ☺️❤️️❤️️
LikeLiked by 1 person
My absolute favorite of all time… your outdoor lights! I love that! The planter is a quick second, I was going to do one with the hubby’s crystals in it. The curtains with the clips! BEST IDEA EVER! Oh, I’m kicking myself right now as I just donated about 10 clipboards thinking they were ugly. Shoot! Your ideas would’ve spruced them right up! Great post! Really so many great ideas… wow.
LikeLiked by 2 people
Oh Shoot! I feel the same way. I used to kick myself when I came up with an idea after donating something. Those clip boards are great. You can even cover them with contact paper for a really beautiful look. Then Spray Paint the clip gold metallic….gorgeous for just hanging around….get it….hanging around! hahaha. How are you doing honey?? Hoping your not in a flare! Lot’s of love coming your way!. .and hugs
LikeLiked by 2 people
I’m good. Just back after a little time off. How are you? Still producing magical craft posts for sure!!💜😊
LikeLiked by 1 person
I had the 3rd surgery on my foot. The first dr really messed up my foot. The second repaired, but the scres broke inside and were backing up. After seeing my RA dr. he researched a doctor for me and found a great one at UCLA. He takes patients that other drs can’t fix. Had the surgery this month, on a knee bike, which is fun! So far no flares, which is great. I am good, I try to let nothing get me down. I spent the last 2 months building a Cheval Mirror for my granddaughter. Got it all made, painted, then when I was trying to balance the mirror onto the stand, it fell and the mirror broke. I may post it anyway! I had to order a new mirror for it.☺️❤️️❤️️
LikeLiked by 2 people
Your strength amazes me! Post it! And never let anything get you down! I love that.😊💜
LikeLiked by 2 people
I just may, next week. Thank you honey for the vote of confidence. Where there is a will, there is a way! I’m not going to quit! At least I hope not!☺️❤️️❤️️
LikeLiked by 2 people
😊💜🎉
LikeLiked by 1 person
❤️️☺️❤️️
LikeLiked by 2 people
Glad to hear you are feeling better honey! ☺️❤️️❤️️
LikeLiked by 2 people
Interesting projects. I always love to seewhat you have next
LikeLiked by 3 people
Thank you so much Crystal…next week is going to be awesome!❤️️☺️❤️️
LikeLiked by 2 people
I am looking forward to it. Every week with you is awesome
LikeLiked by 2 people
Thank you Crystal, youre so sweet!❤️️☺️❤️️
LikeLiked by 1 person
Loved that gumboot full of flowers.
LikeLiked by 3 people
I love it too!!
LikeLiked by 2 people
Soo many neat ideas! Amazing!! Thanks!
LikeLiked by 2 people
Thank you so much!!!❤️️☺️❤️️
LikeLiked by 1 person
useful ideas to decorate home sweet home…
LikeLiked by 1 person
Thank you so much Chiru! ☺️❤️️
LikeLiked by 1 person
I like the boot with the flowers in them!
LikeLiked by 1 person
Isn’t that adorable!Thank you!☺️❤️️
LikeLiked by 1 person
I will tell my wife about it
LikeLike
Wonderful! I just made a bit ago a cute Easter craft ” Bunny Pot” that your son could make with mom! Have a great day Benjamin!!☺️❤️️
LikeLiked by 1 person
Very cool!
LikeLiked by 1 person
☺️❤️️
LikeLiked by 1 person
thank you so much for sharing!
LikeLike
❤️️☺️
LikeLike
Lovely!
I DIY headband from old T-Shirt..
LikeLiked by 1 person
Awesome! Love!!!!
LikeLiked by 1 person
🙂
LikeLiked by 1 person
❤️️☺️❤️️
LikeLike
Wow! We did the hand band too!
LikeLiked by 1 person
Is it a fun and easy idea to update your décor?
LikeLiked by 1 person
Yeah! 🙂
LikeLiked by 1 person
☺️❤️️
LikeLike
Ha. Love the gumboot! I have a few lying around the house. None that pretty tho.
LikeLiked by 1 person
I bet you are looking at them differently now???
LikeLiked by 1 person
I will have to get the spiders out of them first. That is something I don’t like. Hairy little gumboot dwellers. Some of them are bigger than my car, which is not hard as that is a Suzuki.
LikeLiked by 1 person
Oh No! Can’t you put vacuum hose inside?
LikeLiked by 1 person
Then all I’ll have is annoyed spiders living in my Hoover! 😀
LikeLiked by 1 person
hmm, spray with pesticide first, but outside so anything trying to flee won’t be in your space.
LikeLiked by 1 person
Love it!! Thanks for the ideas!
LikeLike
It was my pleasure Budget Abode! I’m so glad you liked the ideas! Love to hear back from you when you’ve tried one!
LikeLiked by 1 person
Such great craft ideas!
LikeLiked by 1 person
Thank you so much
LikeLiked by 1 person
So cute
LikeLiked by 1 person
Thank you so much Kristen . I hope you have a fabulous Memorial Day !🤗
LikeLike
Amazing works! Thank you for sharing!
LikeLiked by 1 person
Thank you so much, it’s such a pleasure sharing!😉❤️️
LikeLiked by 1 person
An amazing range of tips and tricks there! So much inspiration! Thanks, Mel
LikeLiked by 1 person
What a wonderful complement , thank you so much! ☺️❤️️❤️️
LikeLiked by 2 people
These are all absolutely genius ideas. I particularly like the glass jars with the door knobs on them and the cushion idea… oh and the burlap table runner, to be honest I love them all lol 😂
LikeLike
I am so happy to hear that! Are you going to do any??
LikeLiked by 1 person
Yes I think I will try the burlap table runner to start with. ❤️
LikeLike
check out this (highlight and paste) this: https://kelleysdiy.com/2017/09/20/burlap-table-runner/
LikeLiked by 1 person
Ohhh thank you so much, you’re a genius! I also gave you a follow too as I love your blog. I will definitely save this step by step tutorial ❤️
LikeLike
That’s great! Hope your weekend is wonderful! 😊❤️️🤗
LikeLiked by 1 person
Thank you so much for re posting!😊❤️️🤗
LikeLike
Lovely ideas
LikeLike